MEET THE SURGEON

Dr Greg Couzens, FRACS (Orth)
Fellowship trained Hand Surgeon
Co-director Brisbane Hand & Upper
Limb Fellowship program
Researcher at Institute of Biomedical Health and Innovation, Queensland University of Technology.
OVERVIEW
14-year-old right-hand dominant female competitive equestrian rider presented with a malunited radial condylar fracture of the middle phalanx of the left ring finger.
The patient presented to Dr. Couzens with a cosmetic deformity defined by 20 degrees of angulation. Dr Couzens elected to manage the deformity with a sliding osteotomy using a 1.5x8mm and a 1.5x10mm FO microscrew.
CASE INTRODUCTION
14 year-old right-hand dominant female presented with a 20 degree angulation of the middle phalanx of the left ring finger resulting from a malunited radial condylar fracture.
CASE PRESENTATION
The patient injured her left ring finger in an equestrian accident in December 2017. She presented to Dr Couzens 7 months later, in July 2018, complaining of a crooked finger. Upon X-ray, it was shown to be secondary to a malunion of the middle phalanx, complicated with an articular step.
PRE-OPERATIVE PLAN
To correct the deformity, Dr Couzens elected to perform a sliding osteotomy on the head of the middle phalanx. As this is a paediatric case, a 1.5mm FO cannulated Microscrew was elected as the implant of choice, due to the expected small size of the osteotomy fragment.
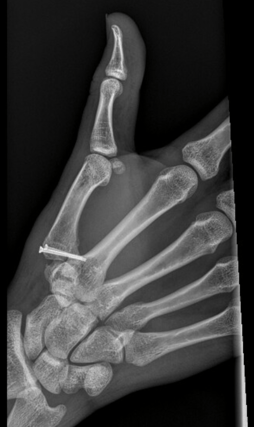
Below: Pre-Operative Imaging

SURGICAL APPROACH
A dorsal approach was utilised by mobilising the extensor tendon and leaving it attached at its insertion point. Once on bone, the oblique osteotomy was planned by identifying the distal articular step and accommodating for the oblique cut, ensuring that enough fragment is left for definitive fixation.
As this is an osteotomy of a finger, a microsaw is advised, utilising the smallest blade possible. To minimise the effect of vibration, it is suggested the saw begins without bone contact and comes down on the bone in a controlled and sweeping motion from distal to proximal along the line of the planned osteotomy. During sawing, the assistant applies irrigation and suction to remove any bone debris and to decrease the potential for thermal osteonecrosis.
Reduction
Once the osteotomy is completed, the fragment is controlled by placing an initial k-wire into the osteotomy fragment positioned in the distal third. The k-wire can then be used to control the fragment through a joystick motion, assisting in the reduction of the fragment to the middle phalanx. If the surgeon is having difficulty in the reduction, the osteotomy cut should be inspected and irrigated to ensure that there is no debris blocking the reduction. Additionally, as this is a chronic injury, contractures are common, and consideration must be given to releasing the soft tissues which can resist the definitive reduction.
Once satisfactory reduction is achieved, the initial k-wire can be driven across the osteotomy site into the adjacent middle phalanx to achieve temporary fixation. A second wire is then placed through the proximal third of the osteotomy fragment and through into the middle phalanx to ensure rotational stability and to reinforce the temporary construct. An image intensifier can then be used to confirm satisfactory reduction.
Implant selection
Once temporary reduction is achieved, care must be taken to ensure that the k-wires are not excessively protruding from the far cortex. After which, the FO depth gauge can be used to measure the length of the protruding k-wires to identify the required length of the associated definitive implant.
As the bone is not yet compressed, it is advised that the surgeon consider removing 1-2mm off the measured length to accommodate for any compression of the fragment to the adjacent bone for when the screw is placed in situ.
In this case, a measurement of 13mm was taken and a corresponding 10mm screw was selected on the distal wire. On the proximal wire, a measurement of 9mm was taken and a screw of 8mm was selected. As this is a paediatric case, a 1.5mm screw was chosen as it has sufficient strength and allows more bone to remain.
Bone preparation
To prepare for screw insertion, a 1.1mm cannulated drill is used to create the pilot hole, while leaving the k-wire in-situ. This is one of the main benefits of this set. The size and cannulation of all instru- ments allows complete preparation of the bone and definitive fixation without having to remove the temporary k-wires or risking the loss of reduction. In this operation, not having to remove k-wires when preparing or inserting screws removed a lot of traditional frustration, and streamlined the procedure.
Implant insertion
A countersink was chosen to be used in this case. While the Microscrew does have a low-profile head, it was decided due to the minimal amount of overlying soft tissue and the relative small size, the additional intervention to further minimise the potential for soft tissue irritation would be best practice.
After the hole is drilled and countersunk, the respective implants are inserted into place. Image intensifier X-rays are taken to confirm the appropriateness of the definitive fixation. The wound was washed and closed and the patient placed in a volar slab for comfort.
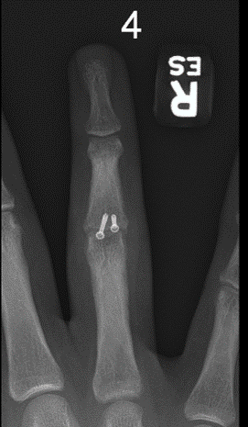
Below: Intra-operative fluoroscopic images


FOLLOW UP
The patient was changed from a volar slab to a splint within the first week post surgery, and managed with hand therapy to promote early range of motion. As this is a definitive internal fixation, the patient was allowed to use her hand, however had to refrain from significant load bearing activities, such as her participation in equestrian competing, until union was confirmed.
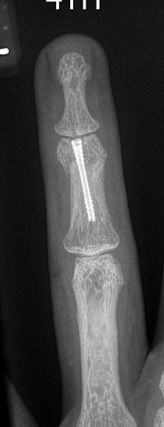
Union was confirmed 6 weeks post surgery by X-ray. Range of motion was -10 to 70 degrees. Once union was confirmed, the patient was allowed to return to full function.
Below: Post operative images


DISCUSSION
The correction of deformities of DIP joints are challenging. The use of condylar osteotomies in paediatric patients adds additional challenges and becomes highly complex in chronic cases where contractures are established. These injuries are complex to manage due to the small size of the fragments, limited surgical access and opposing soft tissue forces. The 1.5mm FO Microscrew has become the implant of choice in these distal and complex operations. The fully cannulated system improves usability and assists with providing early and maintained control throughout the operation.